常见服务架设
NTP
简介
Network Time Protocol-NTP 是用来使计算机时间同步化的一种协议,它可以使计算机对其服务器或时钟源(如石英钟,GPS 等等)做同步化,它可以提供高精准度的时间校正(LAN 上与标准间差小于 1 毫秒,WAN 上几十毫秒),且可使用加密确认的方式来防止恶毒的协议攻击。默认使用 UDP 123 端口
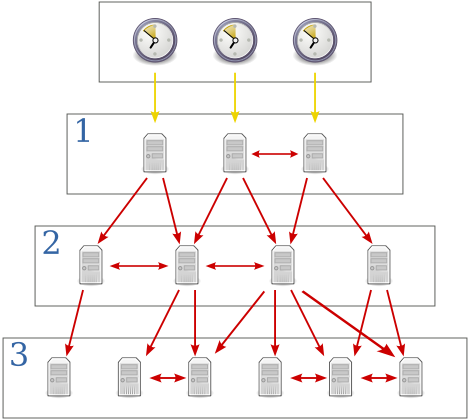
NTP 提供准确时间,首先需要一个准确的 UTC 时间来源,NTP 获得 UTC 的时间来源可以从原子钟、天文台、卫星,也可从 Internet 上获取。时间服务器按照 NTP 服务器的等级传播,根据离外部 UTC 源的远近将所有服务器归入不用的层 (Stratum) 中。Stratum-1 在顶层由外部 UTC 接入,stratum-1 的时间服务器为整个系统的基础,Stratum 的总数限制在 15 以内。下图为 NTP 层次图:
ntpd
NTP Server 安装配置
关于 NTP 服务器的安装,根据不同版本安装方法也不同。REDHAT 系统则可以使用 yum 安装,Ubuntu 系列可以使用 apt-get 安装,这里不做具体的介绍,主要详细介绍配置文件的信息。
对于 CentOS 过滤注释和空行后,NTP 配置文件内容如下
# grep -vE '^#|^$' /etc/ntp.conf
driftfile /var/lib/ntp/drift

# 默认对所有 client 拒绝所有的操作
restrict default kod nomodify notrap nopeer noquery
restrict -6 default kod nomodify notrap nopeer noquery

# 允许本机地址的一切操作
restrict 127.0.0.1
restrict -6 ::1

# 允许其他机器连接
restrict default kod nomodify

server 0.centos.pool.ntp.org
server 1.centos.pool.ntp.org
server 2.centos.pool.ntp.org
includefile /etc/ntp/crypto/pw
keys /etc/ntp/keys
配置选项说明
driftfile选项, 用来保存系统时钟频率偏差。 ntpd 程序使用它来自动地补偿时钟的自然漂移, 从而使时钟即使在切断了外来时源的情况下, 仍能保持相当的准确度。无需更改restrict语法为:restrict IP mask 掩码 参数- IP 规定了允许或不允许访问的地址(此处若为 default,即为 0.0.0.0 所有 ip),配合掩码可以对某一网段进行限制。
ignore: 关闭所有 NTP 服务nomodiy: 客户端不能修改服务端的时间,但可以作为客户端的校正服务器notrust: 拒绝没有通过认证的客户端kod: kod 技术科阻止 "Kiss of Death" 包(一种 DOS 攻击)对服务器的破坏nopeer: 不与其它同一层的 NTP 服务器进行同步noquery: 不提供时间查询,即用户端不能使用 ntpq,ntpc 等命令来查询 ntp 服务器notrap: 不提供trap远端事件登陆的功能
- IP 规定了允许或不允许访问的地址(此处若为 default,即为 0.0.0.0 所有 ip),配合掩码可以对某一网段进行限制。
server [IP|FQDN|prefer]指该服务器上层 NTP Server,使用 prefer 的优先级最高,没有使用 prefer 则按照配置文件顺序由高到低,默认情况下至少 15min 和上层 NTP 服务器进行时间校对fudge: 可以指定本地 NTP Server 层,如fudge 127.0.0.1 stratum 9broadcast 网段 子网掩码: 指定 NTP 进行时间广播的网段,如broadcast 192.168.1.255logfile: 可以指定 NTP Server 日志文件
bill 提醒
restrict 用于权限控制,server 用于设定上级时间服务器
主要是这两个参数
几个与 NTP 相关的配置文件:/usr/share/zoneinfo/、/etc/sysconfig/clock、/etc/localtime
/usr/share/zoneinfo/: 存放时区文件目录/etc/sysconfig/clock: 指定当前系统时区信息/etc/localtime: 相应的时区文件
如果需要修改当前时区,则可以从 /usr/share/zoneinfo/ 目录拷贝相应时区文件覆盖 /etc/localtime 并修改 /etc/sysconfig/clock 即可
cp /usr/share/zoneinfo/Asia/Shanghai /etc/localtime
sed -i 's:ZONE=.*:ZONE="Asia/Shanghai":g' /etc/sysconfig/clock
相关命令
ntpstat 查看同步状态
# ntpstat
synchronised to NTP server (192.168.0.18) at stratum 4
   time correct to within 88 ms      # 表面时间校正 88ms
   polling server every 1024 s        # 每隔 1024s 更新一次
ntpq 列出上层状态
# ntpq -np
   remote refid  st t when poll reach   delay   offset  jitter
==============================================================
* NTPD(IP)  IP   3  u  101 1024  377   14.268    0.998   0.143
输出说明:
remote: NTP Serverrefid: 参考的上层 ntp 地址st: 层次when: 上次更新时间距离现在时常poll: 下次更新时间reach: 更新次数delay: 延迟offset: 时间补偿结果jitter: 与 BIOS 硬件时间差异
ntpdate 同步当前时间:ntpdate NTP 服务器地址
chrony
使用安装命令安装 chrony 包即可
chrony server
配置文件: /etc/chrony.conf
对于 chrony server 来说,主要配置两项,上游的 ntp 服务器和对下游的权限
- 上游的 ntp 服务器
- 有固定的 ntp 服务器或者可连互联网
- 配置
server 0.centos.pool.ntp.org iburst即可- 无外网环境使用本地的时间进行往下游同步
- 配置
local stratum 10- 对下游的权限
allow 10.0.0.0/24对 10.0.0 网段开放allow 0/0对所有 IP 开放
bill 提醒
(1) 无外网环境时,如果没有设置 local stratum 0,下游服务器显示的状态是不可达状态
(2) 不加 allow 记录时,默认拒绝所有连接
(3) chrony 端口为 udp 123
启动并设置开机自启
# systemctl enable chronyd.service
# systemctl start chronyd.service
chrony client
对于 client 来说,只需要配置上游的服务器
配置文件: /etc/chrony.conf
添加 server 上游服务器IP/主机名 iburst即可
启动并设置开机自启
# systemctl enable chronyd.service
# systemctl start chronyd.service
查看同步状态
#chronyc sources -v
上面命令会输出上游服务器的连接状态
* 正常? 不可达
Cron
Cron 基础
什么是 cron, crond, crontab
cron is the general name for the service that runs scheduled actions. crond is the name of the daemon that runs in the background and reads crontab files.
简单理解:cron 是服务,crond 是守护进程, crontab 的 crond 的配置文件。
crontab 选项
crontab -e: Edit your crontab file, or create one if it doesn't already exist. # 推荐使用命令新增计划任务 -- 语法检查crontab -l: Display your crontab file.crontab -r: Remove your crontab file. # 慎用crontab -u user: Used in conjunction with other options, this option allows you to modify or view the crontab file of user. When available, only administrators can use this option.
crontab 格式
minute(s) hour(s) day(s) month(s) weekday(s) command(s)
# Use the hash sign to prefix a comment
# +—————- minute (0 – 59)
# |  +————- hour (0 – 23)
# |  |  +———- day of month (1 – 31)
# |  |  |  +——- month (1 – 12)
# |  |  |  |  +—- day of week (0 – 7) (Sunday=0 or 7)
# |  |  |  |  |
# *  *  *  *  *  command to be executed
使用举例
使用命令 crontab -e 编辑 crontab 文件。
(1) 在每天的 7 点同步服务器时间
0 7 * * * ntpdate 192.168.1.112
(2) 每两个小时执行一次
0 */2 * * * echo "2 minutes later" >> /tmp/output.txt
(3) 每周五早上十点写周报
0 10 * * * 5 /home/jerryzhang/update_weekly.py
(4) 每天 6, 12, 18 点执行一次命令
0 6,12,18 * * * /bin/echo hello
(5) 每天 13, 14, 15, 16, 17 点执行一次命令
0 13-17 * * * /bin/echo hello
注:
- 程序执行完毕,系统会给对应用户发送邮件,显示该程序执行内容,如果不想收到,可以重定向内容
> /dev/null 2>&1 - 如果执行语句中有
%号,需要使用反斜杠 '\' 转义
rsync
rsync 基本介绍
rsync 是类 unix 系统下的数据镜像备份工具,从软件的命名上就可以看出来了—— remote sync。它的特性如下:
- 1、可以镜像保存整个目录树和文件系统
- 2、可以很容易做到保持原来文件的权限、时间、软硬链接等等
- 3、无须特殊权限即可安装
- 4、优化的流程,文件传输效率高
- 5、可以使用 rsh、ssh 等方式来传输文件,当然也可以通过直接的 socket 连接
- 6、支持匿名传输
在使用 rsync 进行远程同步时,可以使用两种方式:远程 Shell 方式(用户验证由 ssh 负责)和 C/S 方式(即客户连接远程 rsync 服务器,用户验证由 rsync 服务器负责)。
无论本地同步目录还是远程同步数据,首次运行时将会把全部文件拷贝一次,以后再运行时将只拷贝有变化的文件(对于新文件)或文件的变化部分(对于原有文件)。
rsync 工作场景
- 两台服务器之间数据同步。
- 把所有客户服务器数据同步到备份服务器,生产场景集群架构服务器备份方案。
- rsync 结合 inotify 的功能做实时的数据同步。
使用方法
rsync 可以使用 ssh 和 C/S 方式进行传输文件,以下使用 ssh 方式
rsync [OPTION]... SRC [SRC]... [USER@]HOST:DEST # 执行“推”操作
or   rsync [OPTION]... [USER@]HOST:SRC [DEST]   # 执行“拉”操作
rsync 选项
Usage: rsync [OPTION]... SRC [SRC]... DEST
  or   rsync [OPTION]... SRC [SRC]... [USER@]HOST:DEST
  or   rsync [OPTION]... SRC [SRC]... [USER@]HOST::DEST
  or   rsync [OPTION]... SRC [SRC]... rsync://[USER@]HOST[:PORT]/DEST
  or   rsync [OPTION]... [USER@]HOST:SRC [DEST]
  or   rsync [OPTION]... [USER@]HOST::SRC [DEST]
  or   rsync [OPTION]... rsync://[USER@]HOST[:PORT]/SRC [DEST]
The ':' usages connect via remote shell, while '::' & 'rsync://' usages connect
to an rsync daemon, and require SRC or DEST to start with a module name.
注: 在指定复制源时,路径是否有最后的 “/” 有不同的含义,例如:
- /data :表示将整个 /data 目录复制到目标目录
- /data/ :表示将 /data/ 目录中的所有内容复制到目标目录
常用选项
-v: Verbose (try -vv for more detailed information) # 详细模式显示-e"ssh options" : specify the ssh as remote shell # 指定 ssh 作为远程 shell-a: archive mode # 归档模式,表示以递归方式传输文件,并保持所有文件属性,等于 -rlptgoD-r(--recursive) : 目录递归-l(--links) :保留软链接-p(--perms) :保留文件权限-t(--times) :保留文件时间信息-g(--group) :保留属组信息-o(--owner) :保留文件属主信息-D(--devices) :保留设备文件信息
-z: 压缩文件-h: 以可读方式输出-H: 复制硬链接-X: 保留扩展属性-A: 保留 ACL 属性-n: 只测试输出而不正真执行命令,推荐使用,特别防止--delete误删除!--stats: 输出文件传输的状态--progress: 输出文件传输的进度––exclude=PATTERN: 指定排除一个不需要传输的文件匹配模式––exclude-from=FILE: 从 FILE 中读取排除规则––include=PATTERN: 指定需要传输的文件匹配模式––include-from=FILE: 从 FILE 中读取包含规则--numeric-ids: 不映射 uid/gid 到 user/group 的名字-S, --sparse: 对稀疏文件进行特殊处理以节省 DST 的空间(有空洞文件时使用)--delete: 删除 DST 中 SRC 没有的文件,也就是所谓的镜像 [mirror] 备份-P等同于--partial保留那些因故没有完全传输的文件,以是加快随后的再次传输
一些命令
常用命令
#rsync -avzP --delete [SRC] [DEST]
注: 日常传输时参数记不清楚时,只需要加 -a 参数即可,如果有稀疏文件,则添加 -S 选项可以提升传输性能。
[tips]
稀疏文件(Sparse File)

在 UNIX 文件操作中,文件位移量可以大于文件的当前长度,在这种情况下,对该文件的下一次写将延长该文件,并在文件中构成一个空洞。位于文件中但没有写过的字节都被设为 0。

稀疏文件与其他普通文件基本相同,区别在于文件中的部分数据是全 0,且这部分数据不占用磁盘空间。
下面是稀疏文件的创建与查看方法
[root@Linux ceshi]# dd if=/dev/zero of=sparse-file bs=1 count=1 seek=1024k
[root@Linux ceshi]#  ls -l sparse-file
-rw-r--r-- 1 root root 1048577 6 月  19 10:20 sparse-file
[root@Linux ceshi]# du -sh sparse-file
4.0K    sparse-file
[root@Linux ceshi]# cat sparse-file  >> meetbill_file
[root@Linux ceshi]# du -sh meetbill_file
1.1M    meetbill_file
[root@Linux ceshi]# ll
总用量 1032
-rw-r--r-- 1 root root 1048577 6 月  19 10:21 meetbill_file
-rw-r--r-- 1 root root 1048577 6 月  19 10:20 sparse-file
[root@Linux ceshi]# ll -h
总用量 1.1M
-rw-r--r-- 1 root root 1.1M 6 月  19 10:21 meetbill_file
-rw-r--r-- 1 root root 1.1M 6 月  19 10:20 sparse-file
ssh 端口非默认 22 同步
使用 ssh 方式传输时如果连接服务器 ssh 端口非标准,则需要通过 -e 选项指定:
#rsync -avzP --delete -e "ssh -p 22222" [USER@]HOST:SRC [DEST]
ssh 自动接受公钥和修改 known_hosts 文件
#rsync -a -e "ssh -oUserKnownHostsFile=/dev/null -oStrictHostKeyChecking=no" [USER@]HOST:SRC [DEST]
inotify+rsync 实现实时文件同步
存储数据异地灾备
需求背景
服务器文件需要实时同步,即使是轮询,也存在同步延迟,inotify 的出现让真正的实时成为了现实 我们可以用 inotify 去监控文件系统的事件变化,一旦有我们期望的事件发生,就使用 rsync 进行冗余同步
架构
| 用途 | IP |
|---|---|
| 服务端 A | 192.168.199.101 |
| 服务器 B(备份服务器) | 192.168.199.102 |
   +--------+          +-------------------+
   |服务器 A |--------->|服务器 B(备份服务器)|
   +--------+          +-------------------+

  inotify+rsync             rsync
脚本内容
所有配置只需要在服务器 A 上配置即可
(1) 安装 inotify-tools(yum -y install inotify-tools)
(2) 配置服务器 A 使用秘钥登录服务器 B
(3) 在服务器 A 上编写脚本,主要配置服务器 B 的机器 IP,登录用户,以及服务器器 A 的存储目录和存储数据异地灾备目录
将此文件保存到 /opt/inotify_rsync.sh
    #!/bin/bash
    host=192.168.199.102
    user=root
    # 服务器存储目录
    src='/tmp/src1/'
    # 存储数据异地灾备目录
    dest='/tmp/dest1'

    inotifywait -mrq -e modify,attrib,moved_to,moved_from,move,move_self,create,delete,delete_self --timefmt='%d/%m/%y %H:%M' --format='%T %w%f %e' $src | while read chgeFile
    do
        rsync -avPz --delete $src $user@$host:$dest &>>./rsync.log
    done
下载脚本
#curl -o inotify_rsync.sh https://raw.githubusercontent.com/meetbill/op_practice_code/master/Linux/service/inotify_rsync.sh
(3) 启动异地灾备程序
    #nohup /bin/bash /opt/inotify_rsync.sh &  // 后台不挂断地运行命令
    #echo "nohup /bin/bash /opt/inotify_rsync.sh &" >> /etc/rc.local // 设置 linux 服务器启动自动启动 nohup
原理
- 使用 inotifywait 监控文件系统时间变化
- while 通过管道符接受内容,传给 read 命令
- read 读取到内容,则执行 rsync 程序
常见问题
对大磁盘进行 inotify 监听时出错
Failed to watch /mnt/;upper limit on inotify watches reached!
Please increase the amount of inotify watches allowed per user via `/proc/sys/fs/inotify/max_user_watches’.`
cat 一下这个文件,默认值是 8192,echo 8192000 > /proc/sys/fs/inotify/max_user_watches 即可~
telnet-server
安装使用
#curl -o telnet-server.tar.gz https://raw.githubusercontent.com/meetbill/op_practice_code/master/Linux/service/telnet-server.tar.gz
#tar -zxvf telnet-server.tar.gz
#cd telnet-server*
#sh start.sh
执行程序后有三项,执行第一项可以进行安装并启动 telnet-server,第二项会关闭 telnet-server 并将开机自动启动关闭
测试
需要测试 telnet 是否成功开启
#telnet localhost
输入用户名密码能登录成功。同时需要测试下其他机器远程 telnet 是否成功,如果不成功,那么很有可能是防火墙的问题
#iptables -I INPUT -p tcp --dport 23 -jACCEPT
#service iptables save
#service iptables restart
ftp
ftp 简介
ftp 工作会启动两个通道:控制通道 , 数据通道。在 ftp 协议中,控制连接均是由客户端发起的,而数据连接有两种模式:port 模式(主动模式)和 pasv 模式(被动模式)
PORT 模式: 在客户端需要接收数据时,ftp_client (大于 1024 的随机端口) —> PORT 命令 —> ftp_server (21) 发送 PORT 命令,这个 PORT 命令包含了客户端是用什么端口来接收数据(大于 1024 的随机端口),在传送数据时, ftp_server 将通过自己的 TCP 20 端口和 PORT 中包含的端口建立新的连接来传送数据。
PASV 模式: 传送数据时,ftp_client —> PASV 命令 —> ftp_server(21) 发送 PASV 命令时,ftp_server 自动打开一个 1024--5000 之间的随机端口并且通知 ftp_client 在这个端口上传送数据,然后客户端向指定的端口发出请求连接,建立一条数据链路进行数据传输。
如果想对访问 FTP 的帐户给予更多的权限,可以用本地帐户来实现。但是,本地帐户默认情况下是可以登陆 Linux 系统的,这样对 Linux 系统来说是一个安全隐患。那么怎么能在灵活的赋予 FTP 用户权限的前提下,保证 FTP 服务器乃至整个 Linux 系统的安全呢?使用虚拟用户就是一种解决办法
安装包
- vsftpd
- db4*
安装配置
[root@meetbill ~]#curl -o ftptool.sh https://raw.githubusercontent.com/meetbill/op_practice_code/master/Linux/service/ftptool.sh
[root@meetbill ~]#chmod +x ftptool.sh
[root@meetbill ~]#./ftptool.sh install_server
[root@meetbill ~]#./ftptool.sh add_user
[root@meetbill ~]#./ftptool.sh start