- 1 Redis
- 2 Redis twemproxy 集群
- 3 redis cluster
- 4 原理说明
- 5 其他相关
1 Redis
1.1 持久化
1.1.1 AOF 重写机制
AOF 重写触发条件
AOF 重写可以由用户通过调用 BGREWRITEAOF 手动触发。 服务器在 AOF 功能开启的情况下,会维持以下三个变量:
- 记录当前 AOF 文件大小的变量 aof_current_size。
- 记录最后一次 AOF 重写之后,AOF 文件大小的变量 aof_rewrite_base_size。
- 增长百分比变量 aof_rewrite_perc。
每次当 serverCron(服务器周期性操作函数,在 src/redis.c 中)函数执行时,它会检查以下条件是否全部满足,如果全部满足的话,就触发自动的 AOF 重写操作:
- 没有 BGSAVE 命令(RDB 持久化)/AOF 持久化在执行;
- 没有 BGREWRITEAOF 在进行;
- auto-aof-rewrite-percentage 参数不为 0
- 当前 AOF 文件大小要大于 server.aof_rewrite_min_size(默认为 1MB)
- 当前 AOF 文件大小和最后一次重写后的大小之间的比率等于或者等于指定的增长百分比(在配置文件设置了 auto-aof-rewrite-percentage 参数,不设置默认为 100%)
如果前面四个条件都满足,并且当前 AOF 文件大小比最后一次 AOF 重写时的大小要大于指定的百分比,那么触发自动 AOF 重写。
源码如下:
 /* Trigger an AOF rewrite if needed */
        // 触发 BGREWRITEAOF
         if (server.rdb_child_pid == -1 &&
             server.aof_child_pid == -1 &&
             server.aof_rewrite_perc &&
             // AOF 文件的当前大小大于执行 BGREWRITEAOF 所需的最小大小
             server.aof_current_size > server.aof_rewrite_min_size)
         {
            // 上一次完成 AOF 写入之后,AOF 文件的大小
            long long base = server.aof_rewrite_base_size ?
                            server.aof_rewrite_base_size : 1;

            // AOF 文件当前的体积相对于 base 的体积的百分比
            long long growth = (server.aof_current_size*100/base) - 100;

            // 如果增长体积的百分比超过了 growth ,那么执行 BGREWRITEAOF
            if (growth >= server.aof_rewrite_perc) {
                redisLog(REDIS_NOTICE,"Starting automatic rewriting of AOF on %lld%% growth",growth);
                // 执行 BGREWRITEAOF
                rewriteAppendOnlyFileBackground();
            }
         }
1.2 主从同步
主从同步相关参数
- repl-backlog-size: 增量重传 buf
- repl-timeout: 主动超时
- client-output-buffer-limit(和写入量有关)
- 这个参数分为 3 部分,第二部分涉及 slave
- slave 部分默认值:256M 64M 60 秒
- output-buffer 缓冲区里放的是主库待同步给从库的操作数据。
- 如果 output-buffer>256M 则从节点需要重新全同步,如果 256>output-buffer>64 且持续时间 60 秒,则从节点需要重新全同步。
主从同步
分别启动 master 和 slave 后,会自动启动同步 slave 出现如下类似日志,则同步已完成:
[4611] 24 Aug 19:11:46.843 * MASTER <-> SLAVE sync started
[4611] 24 Aug 19:11:46.844 * Non blocking connect for SYNC fired the event.
[4611] 24 Aug 19:11:46.844 * Master replied to PING, replication can continue...
[4611] 24 Aug 19:11:46.844 * Partial resynchronization not possible (no cached master)
[4611] 24 Aug 19:11:46.844 * Full resync from master: 0629e2e6e79c13c21ff38b638b6009183140939a:1
[4611] 24 Aug 19:13:55.662 * MASTER <-> SLAVE sync: receiving 5774276835 bytes from master
[4611] 24 Aug 19:14:45.578 * MASTER <-> SLAVE sync: Flushing old data
[4611] 24 Aug 19:16:57.509 * MASTER <-> SLAVE sync: Loading DB in memory
[4611] 24 Aug 19:19:44.191 * MASTER <-> SLAVE sync: Finished with success
repl-timeout
若 slave 日志出现如下行:
# Timeout receiving bulk data from MASTER... If the problem persists try to set the 'repl-timeout' parameter in redis.conf to a larger value.
调整 slave 的 redis.conf 参数:
repl-timeout 60  # 将数值设得更大
如:config set repl-timeout 600
写入量太大超出 output-buffer
若 slave 日志出现如下行:
# I/O error reading bulk count from MASTER: Resource temporarily unavailable
# I/O error trying to sync with MASTER: connection lost
调整 master 分配给 slave client buffer:
client-output-buffer-limit slave 256mb 64mb 60
# 256mb 是一个硬性限制,当 output-buffer 的大小大于 256mb 之后就会断开连接
# 64mb 60 是一个软限制,当 output-buffer 的大小大于 64mb 并且超过了 60 秒的时候就会断开连接
# 或者全部设为 0,取消限制。

如:config set client-output-buffer-limit "slave 0 0 0"
repl-backlog-size 太小导致失败
当 master-slave 复制连接断开,server 端会释放连接相关的数据结构。replication buffer 中的数据也就丢失,当断开的 slave 重新连接上 master 的时候,slave 将会发送 psync 命令(包含复制的偏移量 offset),请求 partial resync。如果请求的 offset 不存在,那么执行全量的 sync 操作,相当于重新建立主从复制。
Unable to partial resync with slave $slaveip:6379 for lack of backlog (Slave request was: 5974421660).
调整 repl-backlog-size 大小
1.3 Redis bug
1.3.1 AOF 句柄泄露 bug
表现
日志中提示
* Residual parent diff successfully flushed to the rewritten AOF (329.83 MB)
* Background AOF rewrite finished successfully
* Starting automatic rewriting of AOF on 100% growth
# Can't rewrite append only file in background: fork: Cannot allocate memory
* Starting automatic rewriting of AOF on 100% growth
# Can't rewrite append only file in background: fork: Cannot allocate memory
* Starting automatic rewriting of AOF on 100% growth
# Can't rewrite append only file in background: fork: Cannot allocate memory
* Starting automatic rewriting of AOF on 100% growth
# Error opening /setting AOF rewrite IPC pipes: Numerical result out of range
* Starting automatic rewriting of AOF on 100% growth
# Error opening /setting AOF rewrite IPC pipes: Numerical result out of range
# Error registering fd event for the new client: Numerical result out of range (fd=10128)
# Error registering fd event for the new client: Numerical result out of range (fd=10128)
使用 lsof 命令检查 fd 数,发现当时进程打开的 fd 数已经达到 10128 个,而其中大部分基本都是 pipe. 在 Redis 中,pipe 主要用于父子进程间通信,如 AOF 重写、基于 socket 的 RDB 持久化等场景。
分析
fd 限制
首先,我们定位到 client 连接报错的主要调用链为 networking.c/acceptCommonHandler => networking.c/createClient => ae.c/aeCreateFileEvent:
static void acceptCommonHandler(int fd, int flags, char *ip) {
    client *c;
    if ((c = createClient(fd)) == NULL) {
        serverLog(LL_WARNING,
            "Error registering fd event for the new client: %s (fd=%d)",
            strerror(errno),fd);
        close(fd); /* May be already closed, just ignore errors */
        return;
    }
    //……
}
int aeCreateFileEvent(aeEventLoop *eventLoop, int fd, int mask,
        aeFileProc *proc, void *clientData)
{
    if (fd >= eventLoop->setsize) {
        errno = ERANGE;
        return AE_ERR;
    }
//……
}
而 eventLoop->setsize 则是在 server.c/initServer 中被初始化和设置的,大小为 maxclient+128 个。而我们 maxclient 采用 Redis 默认配置 10000 个,所以当 fd=10128 时就出错了。
server.el = aeCreateEventLoop(server.maxclients+CONFIG_FDSET_INCR);
aof 重写子进程启动失败为何不关闭 pipe
aof 重写过程由 server.c/serverCron 定时时间事件处理函数触发,调用 aof.c/rewriteAppendOnlyFileBackground 启动 aof 重写子进程。在 rewriteAppendOnlyFileBackground 方法中我们注意到如果 fork 失败,过程就直接退出了。
int rewriteAppendOnlyFileBackground(void) {
    //……
    if (aofCreatePipes() != C_OK) return C_ERR; // 创建 pipe
    //……
    if ((childpid = fork()) == 0) {
        /* Child */
        //……
    } else {
        /* Parent */
        // 子进程启动出错处理
        if (childpid == -1) {
            serverLog(LL_WARNING,
                "Can't rewrite append only file in background: fork: %s",
                strerror(errno)); // 最初内存不足正是这里打出的错误 log
            return C_ERR;
        }
    //……
    }
}
而关闭 pipe 的方法,是在 server.c/serverCron => aof.c/backgroundRewriteDoneHandler 中发现 AOF 重写子进程退出后被调用:
//……
    /* Check if a background saving or AOF rewrite in progress terminated. */
    if (server.rdb_child_pid != -1 || server.aof_child_pid != -1 ||
        ldbPendingChildren())
    {
        //……
        // 任意子进程退出时执行
        if ((pid = wait3(&statloc,WNOHANG,NULL)) != 0) {
            //……
            if (pid == -1) {
                serverLog(……);
            } else if (pid == server.rdb_child_pid) {
                backgroundSaveDoneHandler(exitcode,bysignal);
            } else if (pid == server.aof_child_pid) { // 发现是 aof 重写子进程完成
                backgroundRewriteDoneHandler(exitcode,bysignal); // 执行后续工作,包括关闭 pipe
            }
            //……
        }
    }
//……
由此可见,如果 aof 重写子进程没有启动,则 pipe 将不会被关闭。而下次尝试启动 aof 重写时,又会调用 aof.c/aofCreatePipes 创建新的 pipe。
解决
- 2015 年就被两次在社区上报(参考 https://github.com/antirez/redis/issues/2857
- 2016 年有开发者提交代码修复此问题,直至 2017 年 2 月相关修复才被合入主干(参考 https://github.com/antirez/redis/pull/3408)
- 这只长寿的 bug 在 3.2.9 版本已修复
1.3.2 在 AOF 文件 rewrite 期间如果设置 config set appendonly no,会导致 redis 进程一直死循环不间断触发 rewrite AOF
此 BUG 在 4.0.7 版本修复 (2018.1 月)
https://github.com/antirez/redis/commit/a18e4c964e9248008e0fba7efc1cad9ba9b8b1c3
根因
redis 在 AOF rewrite 期间设置了 appendonly no,会 kill 子进程,设置 server.aof_fd = -1,但是并未更新 server.aof_rewrite_base_size。
在 serverCron 中触发 AOF rewrite 时未判断当前 appendonly 是否为 yes,只判断了 server.aof_current_size 和 server.aof_rewrite_base_size 增长是否超过阈值
AOF rewrite 重写完成后发现 server.aof_fd=-1 也未更新 server.aof_rewrite_base_size,导致 serverCron 中一直触发 AOF rewrite。
1.3.3 redis slots 迁移的时候,永不过期的 key 因为 ttl>0 而过期,导致迁移丢失数据
详细见博客 https://blog.csdn.net/doc_sgl/article/details/53825892
对应 PR: https://github.com/antirez/redis/pull/3673/files
在 4.0rc2 版本中进行修复
根因
所有丢失 key 的 ttl 因为没有处理而使用了前一个 key 的 ttl!
问题出在下面代码的 for 循环,对于不过期的 key,ttl 应该是 0,但是如果前面有过期的 key,ttl>0. 那么在下一个处理不过期 key 时,expireat=-1,不会进入 if,ttl 还是使用前一个 ttl,导致一个永不过期的 key 因为 ttl>0 而过期。
/* MIGRATE host port key dbid timeout [COPY | REPLACE]
 *
 * On in the multiple keys form:
 *
 * MIGRATE host port "" dbid timeout [COPY | REPLACE] KEYS key1 key2 ... keyN */
void migrateCommand(client *c) {
    long long ttl, expireat;
    ttl = 0;
    ...

    /* Create RESTORE payload and generate the protocol to call the command. */
    /*
        问题出在这个 for 循环,对于不过期的 key,ttl 应该是 0,但是如果前面有过期的 key,ttl>0. 在处理不过期 key 时,expireat=-1,导致 ttl 还是使用前一个 ttl.
        导致一个永不过期的 key 因为 ttl>0 而过期。
    */
    for (j = 0; j < num_keys; j++) {
        /
        expireat = getExpire(c->db,kv[j]);
        if (expireat != -1) {
            ttl = expireat-mstime();
            if (ttl < 1) ttl = 1;
        }
        serverAssertWithInfo(c,NULL,rioWriteBulkCount(&cmd,'*',replace ? 5 : 4));
        if (server.cluster_enabled)
            serverAssertWithInfo(c,NULL,
                rioWriteBulkString(&cmd,"RESTORE-ASKING",14));
        else
            serverAssertWithInfo(c,NULL,rioWriteBulkString(&cmd,"RESTORE",7));
        serverAssertWithInfo(c,NULL,sdsEncodedObject(kv[j]));
        serverAssertWithInfo(c,NULL,rioWriteBulkString(&cmd,kv[j]->ptr,
                sdslen(kv[j]->ptr)));
        serverAssertWithInfo(c,NULL,rioWriteBulkLongLong(&cmd,ttl));

        /* Emit the payload argument, that is the serialized object using
         * the DUMP format. */
        createDumpPayload(&payload,ov[j]);
        serverAssertWithInfo(c,NULL,
            rioWriteBulkString(&cmd,payload.io.buffer.ptr,
                               sdslen(payload.io.buffer.ptr)));
        sdsfree(payload.io.buffer.ptr);

        /* Add the REPLACE option to the RESTORE command if it was specified
         * as a MIGRATE option. */
        if (replace)
            serverAssertWithInfo(c,NULL,rioWriteBulkString(&cmd,"REPLACE",7));
    }
1.4 redis 日志
1.4.1 日常日志
DB 0: 1 keys (0 volatile) in 4 slots HT
- Redis 中的 DB 是相互独立存在的,所以可以出现重复的 key。好处一是,对小型项目可以做如下设置: 1 号 DB 做开发,2 号 DB 做测试等等。
- Redis Cluster 方案只允许使用 0 号数据库
- 0 volatile: 目前 0 号 DB 中没有 volatile key,volatile key 的意思是 过特定的时间就被 REDIS 自动删除,在做缓存时有用。
- 4 slots HT: 目前 0 号 DB 的 hash table 只有 4 个 slots(buckets)
- //todo
2 Redis twemproxy 集群
- Nutcracker,又称 Twemproxy(读音:"two-em-proxy")是支持 memcached 和 redis 协议的快速、轻量级代理;
- 它的建立旨在减少后端缓存服务器上的连接数量;
- 再结合管道技术(pipelining*)、及分片技术可以横向扩展分布式缓存架构;
- Redis pipelining(流式批处理、管道技术):将一系列请求连续发送到 Server 端,不必每次等待 Server 端的返回,而 Server 端会将请求放进一个有序的管道中,在执行完成后,会一次性将结果返回(解决 Client 端和 Server 端的网络延迟造成的请求延迟)
2.1 Twemproxy 特性
twemproxy 的特性:
- 支持失败节点自动删除
- 可以设置重新连接该节点的时间
- 可以设置连接多少次之后删除该节点
- 支持设置 HashTag
- 通过 HashTag 可以自己设定将两个 key 哈希到同一个实例上去
- 减少与 redis 的直接连接数
- 保持与 redis 的长连接
- 减少了客户端直接与服务器连接的连接数量
- 自动分片到后端多个 redis 实例上
- 多种 hash 算法:md5、crc16、crc32 、crc32a、fnv1_64、fnv1a_64、fnv1_32、fnv1a_32、hsieh、murmur、jenkins
- 多种分片算法:ketama(一致性 hash 算法的一种实现)、modula、random
- 可以设置后端实例的权重
- 避免单点问题
- 可以平行部署多个代理层,通过 HAProxy 做负载均衡,将 redis 的读写分散到多个 twemproxy 上。
- 支持状态监控
- 可设置状态监控 ip 和端口,访问 ip 和端口可以得到一个 json 格式的状态信息串
- 可设置监控信息刷新间隔时间
- 使用 pipelining 处理请求和响应
- 连接复用,内存复用
- 将多个连接请求,组成 reids pipelining 统一向 redis 请求
- 并不是支持所有 redis 命令
- 不支持 redis 的事务操作
- 使用 SIDFF, SDIFFSTORE, SINTER, SINTERSTORE, SMOVE, SUNION and SUNIONSTORE 命令需要保证 key 都在同一个分片上。
2.2 环境说明
4 台 redis 服务器
10.10.10.4:6379   - 1
10.10.10.5:6379   - 2
2.2 安装依赖
安装 autoconf centos 7 yum 安装既可, autoconf 版本必须 2.64 以上版本
yum -y install autoconf
2.3 安装 Twemproxy
git clone https://github.com/twitter/twemproxy.git
autoreconf -fvi          #生成 configure 文件
./configure --prefix=/opt/local/twemproxy/ --enable-debug=log
make && make install
mkdir -p /opt/local/twemproxy/{run,conf,logs}
ln -s /opt/local/twemproxy/sbin/nutcracker /usr/bin/
2.4 配置 Twemproxy
cd /opt/local/twemproxy/conf/
vi nutcracker.yml #编辑配置文件
meetbill:

  listen: 10.10.10.4:6380                         #监听端口
  hash: fnv1a_64                                  #key 值 hash 算法,默认 fnv1a_64
  distribution: ketama                            #分布算法
  #ketama 一致性 hash 算法;modula 非常简单,就是根据 key 值的 hash 值取模;random 随机分布
  auto_eject_hosts: true                          #摘除后端故障节点
  redis: true                                     #是否是 redis 缓存,默认是 false
  timeout: 400                                    #代理与后端超时时间,毫秒
  server_retry_timeout: 200000                    #摘除故障节点后重新连接的时间,毫秒
  server_failure_limit: 1                         #故障多少次摘除
  servers:
   - 10.10.10.4:6379:1 server1
   - 10.10.10.5:6379:1 server2
检查配置文件是否正确
nutcracker -t -c /opt/local/twemproxy/conf/nutcracker.yml
2.5 启动 Twemproxy
2.5.1 启动命令详解
Usage: nutcracker [-?hVdDt] [-v verbosity level] [-o output file]
[-c conf file] [-s stats port] [-a stats addr]
[-i stats interval] [-p pid file] [-m mbuf size]
参数    释义
-h, –help   查看帮助文档,显示命令选项
-V, –version    查看 nutcracker 版本
-t, –test-conf  测试配置脚本的正确性
-d, –daemonize  以守护进程运行
-D, –describe-stats 打印状态描述
-v, –verbosity=N    设置日志级别 (default: 5, min: 0, max: 11)
-o, –output=S   设置日志输出路径,默认为标准错误输出 (default: stderr)
-c, –conf-file=S    指定配置文件路径 (default: conf/nutcracker.yml)
-s, –stats-port=N   设置状态监控端口,默认 22222 (default: 22222)
-a, –stats-addr=S   设置状态监控 IP,默认 0.0.0.0 (default: 0.0.0.0)
-i, –stats-interval=N   设置状态聚合间隔 (default: 30000 msec)
-p, –pid-file=S 指定进程 pid 文件路径,默认关闭 (default: off)
-m, –mbuf-size=N    设置 mbuf 块大小,以 bytes 单位 (default: 16384 bytes)
2.5.2 启动
nutcracker -d -c /opt/local/twemproxy/conf/nutcracker.yml -p /opt/local/twemproxy/run/redisproxy.pid -o /opt/local/twemproxy/logs/redisproxy.log
2.6 查看状态
2.6.1 状态参数
nutcracker --describe-stats
This is nutcracker-0.2.4

pool stats:
  client_eof          "# eof on client connections"
  client_err          "# errors on client connections"
  client_connections  "# active client connections"
  server_ejects       "# times backend server was ejected"
  forward_error       "# times we encountered a forwarding error"
  fragments           "# fragments created from a multi-vector request"

server stats:
  server_eof          "# eof on server connections"
  server_err          "# errors on server connections"
  server_timedout     "# timeouts on server connections"
  server_connections  "# active server connections"
  requests            "# requests"
  request_bytes       "total request bytes"
  responses           "# respones"
  response_bytes      "total response bytes"
  in_queue            "# requests in incoming queue"
  in_queue_bytes      "current request bytes in incoming queue"
  out_queue           "# requests in outgoing queue"
  out_queue_bytes     "current request bytes in outgoing queue"
2.6.2 状态实例
#curl  -s http://127.0.0.1:22222|python -mjson.tool
{
    "meetbill": {                    # 配置名称
        "client_connections": 0,     # 当前活跃的客户端连接数
        "client_eof": 0,
        "client_err": 2,             # 客户端连接错误次数
        "forward_error": 0,          # 转发错误次数
        "fragments": 0,
        "server_ejects": 0           # 后端服务被踢出次数
        "server1": {
            "in_queue": 0,
            "in_queue_bytes": 0,
            "out_queue": 0,
            "out_queue_bytes": 0,
            "request_bytes": 0,      # 已请求字节数
            "requests": 0,           # 已请求次数
            "response_bytes": 0,     # 已相应字节数
            "responses": 0,          # 已响应次数
            "server_connections": 0, # 当前活跃的服务端连接数
            "server_eof": 0,
            "server_err": 0,         # 服务端连接错误次数
            "server_timedout": 0     # 因连接超时的服务端错误次数
        },
        "server2": {
            "in_queue": 0,
            "in_queue_bytes": 0,
            "out_queue": 0,
            "out_queue_bytes": 0,
            "request_bytes": 0,
            "requests": 0,
            "response_bytes": 0,
            "responses": 0,
            "server_connections": 0,
            "server_eof": 0,
            "server_err": 0,
            "server_timedout": 0
        },
    },
    "service": "nutcracker",
    "source": "meetbill",    # 主机名
    "timestamp": 1520780415, # 当前时间戳
    "uptime": 3160,          # 服务已经启动的时间(单位:秒
    "version": "0.2.4"
}
2.6.3 使用 Python 获取 Twemproxy 状态
使用 curl 获取 Twemproxy 状态时,如果后端的 redis 或者 memcache 过多,将会导致获取状态内容失败,可以进行如下解决方法
def fetch_stats(ip, port):
    s = socket.socket(socket.AF_INET, socket.SOCK_STREAM)
    s.connect((ip, port))
    raw = ""
    while True:
        data = s.recv(1024)
        if len(data) == 0:
            break
        raw += data
    s.close()
    stats = json.loads(raw)
    return stats
3 redis cluster
3.1 cluster 命令
- 集群 (cluster)
- cluster info 打印集群的信息
- cluster nodes 列出集群当前已知的所有节点 (node),以及这些节点的相关信息
- 节点 (node)
- cluster meet
将 ip 和 port 所指定的节点添加到集群当中,让它成为集群的一份子 - cluster forget
从集群中移除 node_id 指定的节点 - cluster replicate
将当前节点设置为 node_id 指定的节点的从节点 - cluster saveconfig 将节点的配置文件保存到硬盘里面
- cluster slaves
列出该 slave 节点的 master 节点 - cluster set-config-epoch 强制设置 configEpoch
- 槽 (slot)
- cluster addslots
[slot ...] 将一个或多个槽 (slot) 指派 (assign) 给当前节点 - cluster delslots
[slot ...] 移除一个或多个槽对当前节点的指派 - cluster flushslots 移除指派给当前节点的所有槽,让当前节点变成一个没有指派任何槽的节点
- cluster setslot
node 将槽 slot 指派给 node_id 指定的节点,如果槽已经指派给另一个节点,那么先让另一个节点删除该槽,然后再进行指派 - cluster setslot
migrating 将本节点的槽 slot 迁移到 node_id 指定的节点中 - cluster setslot
importing 从 node_id 指定的节点中导入槽 slot 到本节点 - cluster setslot
stable 取消对槽 slot 的导入 (import) 或者迁移 (migrate) - 键 (key)
- cluster keyslot
计算键 key 应该被放置在哪个槽上 - cluster countkeysinslot
返回槽 slot 目前包含的键值对数量 - cluster getkeysinslot
返回 count 个 slot 槽中的键 - 其它
- cluster myid 返回节点的 ID
- cluster slots 返回节点负责的 slot
- cluster reset 重置集群,慎用
3.2 redis cluster 配置
cluster-enabled yes
如果配置 yes 则开启集群功能,此 redis 实例作为集群的一个节点,否则,它是一个普通的单一的 redis 实例。
cluster-config-file nodes-6379.conf
虽然此配置的名字叫"集群配置文件",但是此配置文件不能人工编辑,它是集群节点自动维护的文件,主要用于记录集群中有哪些节点、他们的状态以及一些持久化参数等,方便在重启时恢复这些状态。通常是在收到请求之后这个文件就会被更新。
cluster-node-timeout 15000
这是集群中的节点能够失联的最大时间,超过这个时间,该节点就会被认为故障。如果主节点超过这个时间还是不可达,则用它的从节点将启动故障迁移,升级成主节点。注意,任何一个节点在这个时间之内如果还是没有连上大部分的主节点,则此节点将停止接收任何请求。一般设置为 15 秒即可。
cluster-slave-validity-factor 10
如果设置成 0,则无论从节点与主节点失联多久,从节点都会尝试升级成主节点。如果设置成正数,则 cluster-node-timeout 乘以 cluster-slave-validity-factor 得到的时间,是从节点与主节点失联后,此从节点数据有效的最长时间,超过这个时间,从节点不会启动故障迁移。假设 cluster-node-timeout=5,cluster-slave-validity-factor=10,则如果从节点跟主节点失联超过 50 秒,此从节点不能成为主节点。注意,如果此参数配置为非 0,将可能出现由于某主节点失联却没有从节点能顶上的情况,从而导致集群不能正常工作,在这种情况下,只有等到原来的主节点重新回归到集群,集群才恢复运作。
cluster-migration-barrier 1
主节点需要的最小从节点数,只有达到这个数,主节点失败时,它从节点才会进行迁移。更详细介绍可以看本教程后面关于副本迁移到部分。
cluster-require-full-coverage yes
在部分 key 所在的节点不可用时,如果此参数设置为"yes"(默认值), 则整个集群停止接受操作;如果此参数设置为”no”,则集群依然为可达节点上的 key 提供读操作。
3.3 redis cluster 状态
127.0.0.1:8001> cluster info
- cluster_state:ok
- 如果当前 redis 发现有 failed 的 slots,默认为把自己 cluster_state 从 ok 个性为 fail, 写入命令会失败。如果设置 cluster-require-full-coverage 为 no, 则无此限制。
- cluster_slots_assigned:16384 #已分配的槽
- cluster_slots_ok:16384 #槽的状态是 ok 的数目
- cluster_slots_pfail:0 #可能失效的槽的数目
- cluster_slots_fail:0 #已经失效的槽的数目
- cluster_known_nodes:6 #集群中节点个数
- cluster_size:3 #集群中设置的分片个数
- cluster_current_epoch:15 #集群中的 currentEpoch 总是一致的,currentEpoch 越高,代表节点的配置或者操作越新,集群中最大的那个 node epoch
- cluster_my_epoch:12 #当前节点的 config epoch,每个主节点都不同,一直递增,其表示某节点最后一次变成主节点或获取新 slot 所有权的逻辑时间。
- cluster_stats_messages_sent:270782059
- cluster_stats_messages_received:270732696
127.0.0.1:8001> cluster nodes
25e8c9379c3db621da6ff8152684dc95dbe2e163 192.168.64.102:8002 master - 0 1490696025496 15 connected 5461-10922
d777a98ff16901dffca53e509b78b65dd1394ce2 192.168.64.156:8001 slave 0b1f3dd6e53ba76b8664294af2b7f492dbf914ec 0 1490696027498 12 connected
8e082ea9fe9d4c4fcca4fbe75ba3b77512b695ef 192.168.64.108:8000 master - 0 1490696025997 14 connected 0-5460
0b1f3dd6e53ba76b8664294af2b7f492dbf914ec 192.168.64.170:8001 myself,master - 0 0 12 connected 10923-16383
eb8adb8c0c5715525997bdb3c2d5345e688d943f 192.168.64.101:8002 slave 25e8c9379c3db621da6ff8152684dc95dbe2e163 0 1490696027498 15 connected
4000155a787ddab1e7f12584dabeab48a617fc46 192.168.67.54:8000 slave 8e082ea9fe9d4c4fcca4fbe75ba3b77512b695ef 0 1490696026497 14 connected
- 节点 ID:例如 25e8c9379c3db621da6ff8152684dc95dbe2e163
- ip:port:节点的 ip 地址和端口号,例如 192.168.64.102:8002
- flags:节点的角色 (master,slave,myself) 以及状态 (pfail,fail)
- 如果节点是一个从节点的话,那么跟在 flags 之后的将是主节点的节点 ID,例如 192.168.64.156:8001 主节点的 ID 就是 0b1f3dd6e53ba76b8664294af2b7f492dbf914ec
- 集群最近一次向节点发送 ping 命令之后,过了多长时间还没接到回复
- 节点最近一次返回 pong 回复的时间
- 节点的配置纪元 (config epoch)
- 本节点的网络连接情况
- 节点目前包含的槽,例如 192.168.64.102:8002 目前包含的槽为 5461-10922
4 原理说明
4.1 一致性 hash
4.1.1 传统的取模方式
例如 10 条数据,3 个节点,如果按照取模的方式,那就是
- node a: 0,3,6,9
- node b: 1,4,7
- node c: 2,5,8
当增加一个节点的时候,数据分布就变更为
- node a:0,4,8
- node b:1,5,9
- node c: 2,6
- node d: 3,7
总结:数据 3,4,5,6,7,8,9 在增加节点的时候,都需要做搬迁,成本太高
4.1.2 一致性哈希方式
最关键的区别就是,对节点和数据,都做一次哈希运算,然后比较节点和数据的哈希值,数据取和节点最相近的节点做为存放节点。这样就保证当节点增加或者减少的时候,影响的数据最少。还是拿刚刚的例子,(用简单的字符串的 ascii 码做哈希 key):
十条数据,算出各自的哈希值
- 0:192
- 1:196
- 2:200
- 3:204
- 4:208
- 5:212
- 6:216
- 7:220
- 8:224
- 9:228
有三个节点,算出各自的哈希值
- node a: 203
- node g: 209
- node z: 228
这个时候比较两者的哈希值,如果大于 228,就归到前面的 203,相当于整个哈希值就是一个环,对应的映射结果:
- node a: 0,1,2
- node g: 3,4
- node z: 5,6,7,8,9
这个时候加入 node n, 就可以算出 node n 的哈希值:
- node n: 216
这个时候对应的数据就会做迁移:
- node a: 0,1,2
- node g: 3,4
- node n: 5,6
- node z: 7,8,9
这个时候只有 5 和 6 需要做迁移
4.1.3 虚拟节点
另外,这个时候如果只算出三个哈希值,那再跟数据的哈希值比较的时候,很容易分得不均衡,因此就引入了虚拟节点的概念,通过把三个节点加上 ID 后缀等方式,每个节点算出 n 个哈希值,均匀的放在哈希环上,这样对于数据算出的哈希值,能够比较散列的分布(详见下面代码中的 replica)
通过这种算法做数据分布,在增减节点的时候,可以大大减少数据的迁移规模。
4.2 redis 过期数据存储方式以及删除方式
当你通过 expire 或者 pexpire 命令,给某个键设置了过期时间,那么它在服务器是怎么存储的呢?到达过期时间后,又是怎么删除的呢?
4.2.1 存储方式
比如:
redis> EXPIRE book 5
(integer) 1
首先我们知道,redis 维护了一个存储了所有的设置的 key->value 的字典。但是其实不止一个字典的。
redis 有一个包含过期事件的字典
每当有设置过期事件的 key 后,redis 会用当前的事件,加上过期的时间段,得到过期的标准时间,存储在 expires 字典中。
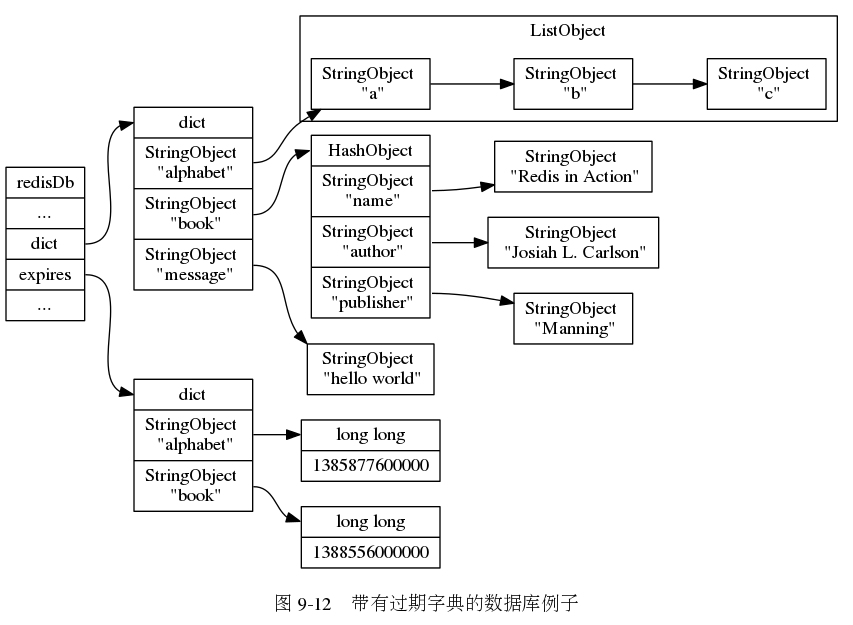
从上图可以看出来,比如你给 book 设置过期事件,那么 expires 字典的 key 也为 book,值是当前的时间 +5s 后的 unix time。
4.2.2 删除方式
如果一个键已经过期了,那么 redis 的如果删除它呢?redis 采用了 2 种删除方式;
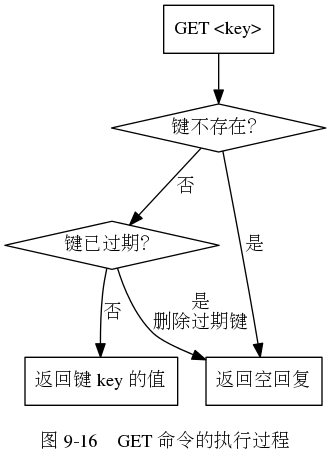
惰性删除
惰性删除的原理是:放任键过期不管,但是每次从键空间获取键的时候,如果该键存在,再去 expires 字典判断这个键是不是过期。如果过期则返回空,并删除该键。过程如下:
- 优点:惰性删除对 cpu 是友好的。保证在键必须删除的时候才会消耗 cpu
- 缺点:惰性删除对内存特别不友好。虽然键过期,但是没有使用则一直存在内存中。
定期删除
redis 架构中的时间事件,每隔一段时间后,在规定的时间内,会主动去检测 expires 字典中包含的 key 进行检测,发现过期的则删除。在 redis 的源码 redis.c/activeExpireCycle 函数中。 下面分别是这个函数的源码与伪代码:
void  activeExpireCycle(int type) {
    // 静态变量,用来累积函数连续执行时的数据
    static  unsigned  int current_db =  0; /* Last DB tested. */
    static  int timelimit_exit =  0; /* Time limit hit in previous call? */
    static  long  long last_fast_cycle =  0; /* When last fast cycle ran. */

    unsigned  int j, iteration =  0;
    // 默认每次处理的数据库数量
    unsigned  int dbs_per_call = REDIS_DBCRON_DBS_PER_CALL;
    // 函数开始的时间
    long  long start =  ustime(), timelimit;

    // 快速模式
    if (type == ACTIVE_EXPIRE_CYCLE_FAST) {
        // 如果上次函数没有触发 timelimit_exit ,那么不执行处理
        if (!timelimit_exit) return;
        // 如果距离上次执行未够一定时间,那么不执行处理
        if (start < last_fast_cycle + ACTIVE_EXPIRE_CYCLE_FAST_DURATION*2) return;
        // 运行到这里,说明执行快速处理,记录当前时间
        last_fast_cycle = start;
    }

    /*
    * 一般情况下,函数只处理 REDIS_DBCRON_DBS_PER_CALL 个数据库,
    * 除非:
    * 当前数据库的数量小于 REDIS_DBCRON_DBS_PER_CALL
    * 如果上次处理遇到了时间上限,那么这次需要对所有数据库进行扫描,
    * 这可以避免过多的过期键占用空间
    */
    if (dbs_per_call > server.dbnum  || timelimit_exit)
    dbs_per_call = server.dbnum;

    // 函数处理的微秒时间上限
    // ACTIVE_EXPIRE_CYCLE_SLOW_TIME_PERC 默认为 25 ,也即是 25 % 的 CPU 时间
    timelimit =  1000000*ACTIVE_EXPIRE_CYCLE_SLOW_TIME_PERC/server.hz/100;
    timelimit_exit =  0;
    if (timelimit <=  0) timelimit =  1;

    // 如果是运行在快速模式之下
    // 那么最多只能运行 FAST_DURATION 微秒
    // 默认值为 1000 (微秒)
    if (type == ACTIVE_EXPIRE_CYCLE_FAST)
    timelimit = ACTIVE_EXPIRE_CYCLE_FAST_DURATION; /* in microseconds. */

    // 遍历数据库
    for (j =  0; j < dbs_per_call; j++) {
        int expired;
        // 指向要处理的数据库
        redisDb *db = server.db+(current_db % server.dbnum);

        // 为 DB 计数器加一,如果进入 do 循环之后因为超时而跳出
        // 那么下次会直接从下个 DB 开始处理
        current_db++;

        do {
            unsigned  long num, slots;
            long  long now, ttl_sum;
            int ttl_samples;

            // 获取数据库中带过期时间的键的数量
            // 如果该数量为 0 ,直接跳过这个数据库
            if ((num =  dictSize(db->expires)) ==  0) {
                db->avg_ttl  =  0;
                break;
            }
            // 获取数据库中键值对的数量
            slots =  dictSlots(db->expires);
            // 当前时间
            now =  mstime();

            // 这个数据库的使用率低于 1% ,扫描起来太费力了(大部分都会 MISS)
            // 跳过,等待字典收缩程序运行
            if (num && slots > DICT_HT_INITIAL_SIZE &&
            (num*100/slots <  1)) break;

            // 已处理过期键计数器
            expired =  0;
            // 键的总 TTL 计数器
            ttl_sum =  0;
            // 总共处理的键计数器
            ttl_samples =  0;

            // 每次最多只能检查 LOOKUPS_PER_LOOP 个键
            if (num > ACTIVE_EXPIRE_CYCLE_LOOKUPS_PER_LOOP)
            num = ACTIVE_EXPIRE_CYCLE_LOOKUPS_PER_LOOP;

            // 开始遍历数据库
            while (num--) {
                dictEntry *de;
                long  long ttl;

                // 从 expires 中随机取出一个带过期时间的键
                if ((de =  dictGetRandomKey(db->expires)) ==  NULL) break;
                // 计算 TTL
                ttl =  dictGetSignedIntegerVal(de)-now;
                // 如果键已经过期,那么删除它,并将 expired 计数器增一
                if (activeExpireCycleTryExpire(db,de,now)) expired++;
                if (ttl <  0) ttl =  0;
                // 累积键的 TTL
                ttl_sum += ttl;
                // 累积处理键的个数
                ttl_samples++;
            }

            // 为这个数据库更新平均 TTL 统计数据
            if (ttl_samples) {
                // 计算当前平均值
                long  long avg_ttl = ttl_sum/ttl_samples;
                // 如果这是第一次设置数据库平均 TTL ,那么进行初始化
                if (db->avg_ttl  ==  0) db->avg_ttl  = avg_ttl;
                /* Smooth the value averaging with the previous one. */
                // 取数据库的上次平均 TTL 和今次平均 TTL 的平均值
                db->avg_ttl  = (db->avg_ttl+avg_ttl)/2;
            }

            // 我们不能用太长时间处理过期键,
            // 所以这个函数执行一定时间之后就要返回

            // 更新遍历次数
            iteration++;

            // 每遍历 16 次执行一次
            if ((iteration &  0xf) ==  0  &&  /* check once every 16 iterations. */
            (ustime()-start) > timelimit)
            {
                // 如果遍历次数正好是 16 的倍数
                // 并且遍历的时间超过了 timelimit
                // 那么断开 timelimit_exit
                timelimit_exit =  1;
            }

            // 已经超时了,返回
            if (timelimit_exit) return;

            // 如果已删除的过期键占当前总数据库带过期时间的键数量的 25 %
            // 那么不再遍历
        } while (expired > ACTIVE_EXPIRE_CYCLE_LOOKUPS_PER_LOOP/4);
    }
}
伪代码是:
# 默认每次检测的数据库数量为 16
DEFAULT_DB_NUMBERS = 16
# 默认每次检测的键的数量最大为 20
DEFAULT_KEY_NUMBERS = 20
# 全局变量,记录当前检测的进度
current_db = 0
def activeExpireCycle():
    # 初始化要检测的数据库数量
    # 如果服务器的数据库数量小于 16,则以服务器的为准
    if server.dbnumbers < DEFAULT_DB_NUMBERS:
        db_numbers = server.dbnumbers
    else
        db_numbers = DEFAULT_DB_NUMBERS

    # 遍历每次数据库
    for i in range(db_numbers):
        # 如果 current_db 的值等于服务器的数量,代表已经遍历全,则重新开始
        if current_db = db_numbers:
            current_db = 0

        # 获取当前要处理的数据库
        redisDb = server.db[current_db]

        # 将数据库索引 +1,指向下一个数据库
        current_db++

        do
            # 检测数据库中的键
            for j in range(DEFAULT_KEY_NUMBERS):
                # 如果数据库中没有过期键则跳过这个库
                if redisDb.expires.size() == 0:break

                # 随机获取一个带有过期事件的键
                key_with_ttl = redisDb.expires.get_random_key()

                # 检测键是不是过期了,如果过期则删除
                if is_expired(key_with_ttl):
                    delete_key(key_with_ttl)
            # 已达到时间上限,则停止处理
            if reach_time_limit(): retrun
        while expired>ACTIVE_EXPIRE_CYCLE_LOOKUPS_PER_LOOP/4
对 activeExpireCycle 进行总结:
- redis 默认 1s 调用 10 次,这个是 redis 的配置中的 hz 选项。hz 默认是 10,代表 1s 调用 10 次,每 100ms 调用一次。
- hz 不能太大,太大的话,cpu 会花大量的时间消耗在判断过期的 key 上,对 cpu 不友好。但是如果你的 redis 过期数据过多,可以适当调大。
- hz 不能太小,因为太小的话,一旦过期的 key 太多可能会过滤不完。
- redis 执行定期删除函数,必须在一定时间内,超过该时间就 return。事件定义为
timelimit = 1000000*ACTIVE_EXPIRE_CYCLE_SLOW_TIME_PERC/server.hz/100可以看出该时间与 hz 成反比,hz 默认 10,timelimit 就为 25ms;hz 修改为 100,那么 timelimit 就为 2.5ms。 - 抽取 20 个数据进行判断删除为一个轮训,每经过 16 个轮训才会去判断一次时间是不是超时。
- 如果一个数据库,使用率低于 1%,则不去进行定期删除操作。
- 如果对一个数据库,这次删除操作,已经删除了 25% 的过期 key,那么就跳过这个库。
4.2.3 redis 主从删除过期 key 方式
当 redis 主从模型下,从服务器的删除过期 key 的动作是由主服务器控制的。
- 1、主服务器在惰性删除、客户端主动删除、定期删除一个 key 的时候,会向从服务器发送一个 del 的命令,告诉从服务器需要删除这个 key。
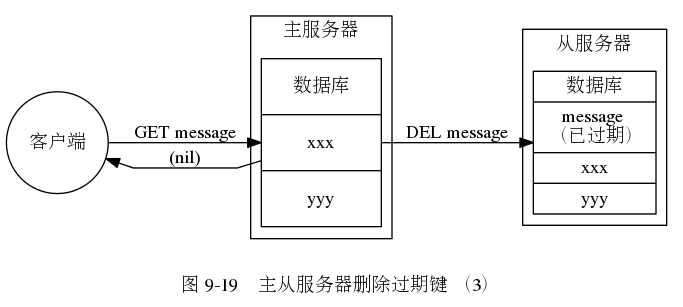
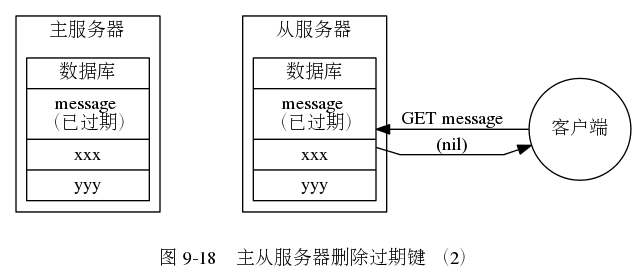
- 2、从服务器在执行客户端读取 key 的时候,如果该 key 已经过期,也不会将该 key 删除,而是返回一个 null
- 3、从服务器只有在接收到主服务器的 del 命令才会将一个 key 进行删除。
4.2.4 总结
- 1、expires 字典的 key 指向数据库中的某个 key,而值记录了数据库中该 key 的过期时间,过期时间是一个以毫秒为单位的 unix 时间戳;
- 2、redis 使用惰性删除和定期删除两种策略来删除过期的 key;惰性删除只会在碰到过期 key 才会删除;定期删除则每隔一段时间主动查找并删除过期键;
- 3、当主服务器删除一个过期 key 后,会向所有的从服务器发送一条 del 命令,显式的删除过期 key;
- 4、从服务器即使发现过期 key 也不会自作主张删除它,而是等待主服务器发送 del 命令,这种统一、中心化的过期 key 删除策略可以保证主从服务器的数据一致性。
5 其他相关
5.1 内核参数 overcommit
它是 内存分配策略,可选值:0、1、2。
- 0, 表示内核将检查是否有足够的可用内存供应用进程使用;如果有足够的可用内存,内存申请允许;否则,内存申请失败,并把错误返回给应用进程。
- 1, 表示内核允许分配所有的物理内存,而不管当前的内存状态如何。
- 2, 表示内核允许分配超过所有物理内存和交换空间总和的内存
什么是 Overcommit 和 OOM
Linux 对大部分申请内存的请求都回复"yes",以便能跑更多更大的程序。因为申请内存后,并不会马上使用内存。这种技术叫做 Overcommit。当 linux 发现内存不足时,会发生 OOM killer(OOM=out-of-memory)。它会选择杀死一些进程(用户态进程,不是内核线程),以便释放内存。 当 oom-killer 发生时,linux 会选择杀死哪些进程?选择进程的函数是 oom_badness 函数(在 mm/oom_kill.c 中),该函数会计算每个进程的点数 (0~1000)。点数越高,这个进程越有可能被杀死。每个进程的点数跟 oom_score_adj 有关,而且 oom_score_adj 可以被设置 (-1000 最低,1000 最高)。
解决方法:
很简单,按提示的操作(将 vm.overcommit_memory 设为 1)即可:可以通过 cat /proc/sys/vm/overcommit_memory 和 sysctl -a | grep overcommit 查看
有三种方式修改内核参数,但要有 root 权限:
- (1)编辑 /etc/sysctl.conf ,改 vm.overcommit_memory=1,然后 sysctl -p 使配置文件生效
- (2)sysctl vm.overcommit_memory=1
- (3)echo 1 > /proc/sys/vm/overcommit_memory